How do I CURE my new Yerba Mate Gourd?
Curing a Yerba Mate Gourd
The name "Mate" derives from the quichua word "matí" that names the gourd that is traditionally used to drink the infusion. The Yerba Mate cup or vessel most commonly used, is a gourd of the Lagenaria Siceraria, a climbing plant. Always remember the gourd is a natural plant product.
The gourd is put to dry and hollowed out. Composed of 90 percent water, the gourd must go through a process of evaporation outdoors for about three or four months.
In the drying process, the gourd will lose its fleshy membrane, leaving it hollow. When dry, the hard-shelled gourds are almost as hard as wood.
There are mate cups that do not need to be cured such as those made of non- porous materials (glass, metal, china, etc.) However, true mate lovers prefer a well cured gourd since it makes the beverage more tasty.
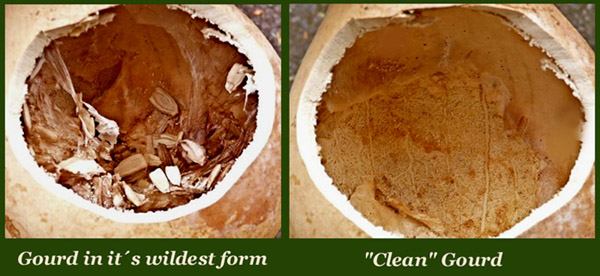
Gourds have a porous, fleshy texture on the inside. Some mate gourds may look "clean" on the inside and some other not. These ones can show some rests of dried membranes and even seeds (this is not very common though) on the inside which you can easily remove with your fingers or a scraping tool if the hole of the gourd is too narrow. Almost 100% of the mate gourds that are sold will look "clean" on the inside. If you see some spots in a new gourd, that´s perfectly normal. Not all gourds have an even color inside.
In the old days, the guaraní indians talked about taking away "the bad spirit" (initial bitterness) each gourd had. That´s where the expression "to cure a gourd" comes from. By "curing" the gourds, the indians prepared them to be the perfect recipient for their favorite drink.
The curing has one purpose : the removal of the inner soft tissues a "clean" gourd still may have. By removing the soft membrane it will insure that your first mate will not be so bitter. You may find on other web sites, books or booklets that you must use old yerba mate in the curing process. This is not entirely necessary as the gourd will finally get its proper taste after several uses of the mate.
The "curing" process has to be done only once when you first get a new gourd.
The best and fastest way in our opinion is to fill your new gourd with almost boiling water (boiled water could crack the gourd), let the hot water sit for approximately 5 - 10 minutes. After this you may use a teaspoon and softly scrape the membrane out of the gourd under running water. If you have successfully removed the majority of the membrane you have completed the curing process. We strongly suggest you complete this process even if the inside of your new gourd looks pretty clean. If the inside of your new gourd has nothing to scrape out (many of our gourds are this way), just do the hot water thing only.
However if you want to use your gourd right away you don't have to cure it at all. The soft membrane will slowly be removed as you empty out the old mate and rinse with running water. The first couple of times the mate may have a more bitter taste by not curing it.
Please do not remove the stem in the center of the gourd. Doing so will cause the gourd to leak. Also, do not use any kind of soap to clean it.
GOURDS WITH METAL RIM :
Add almost boiling water just below the lower part of the metal rim line.
The reason you do not fill the gourd above the rim line is to allow for it to expand and seal tightly with the rim. If you put the water above the rim line when you cure it, your gourd will, more than likely, leak although it may stop after two or three days use because of the continuing expansion of the gourd and the sealing of the rim as we said above.
GOURDS WITHOUT METAL RIM :
Use the same procedure as above except you can fill it to the top with hot water.
GOURDS THAT STATE THEY ARE ALREADY "PRE-CURED" :
Pre-cured gourds have been carefully burnt in order to obtain a nice natural dark brown color. During the process the majority of the inner soft membrane is removed.
TIPS TO PREVENT OR REDUCE MOLD IN YOUR MATE GOURD :
Any natural gourd can grow mold if not dried correctly since it´s a natural living plant and is not made of any synthetic product.
Also the leaves of the yerba leave a dark green tint (not harmful at all either) to the inside of the gourd which is not mold but just a bleeding of the color of the leaves. Some gourds may absorb more tint than others. You´ll also notice that this dark color is stronger towards the mouth of the gourd. This is due to the strong concentration of yerba that rises to the surface of the gourd there.
THIS WILL NOT HARM YOU IN ANY WAY NOR WILL MAKE YOUR GOURD UNUSEABLE.
TIPS :
- After you have finished using your gourd for the day, it is very important that you rinse it well with warm water (no soap, please!!!), dry it out well with a paper towel and position it in a well-ventilated, warm place, preferably at a 45° angle so that the circulating air flows through the gourd.
- Once you finish drinking, thrown the used yerba, rinsed the gourd and dried it with a paper towel, sometimes it is a good idea to put the mate gourd mouth down near the stove for a few seconds so that the very hot air can accelerate the drying. Needless to say, this should be done very carefully. If you are a "sweet" drinker and generally add sugar or honey to your gourd, you must rinse it very well after use.
- If you see small dark spots, even in brand new gourds, is perfectly normal. Do not panic. If you still care too much about it, many times you can chip them off with your fingernail or scrape them out with a small spoon but this not the point. Your gourd will be in top condition after several weeks of use and proper drying. With proper use, the gourd will finally get a slightly grayish-green uniform color. From time to time, it is also a good idea to rinse out the inside of the gourd with a little lemon juice, then plain water and let it sit out in the sun for a couple of hours. Sunlight is the worst enemy for mold. However, If you dry your gourd properly after using it, chances are you do not need to do so.
- It is also advisable not to leave your last brewing inside your mate gourd for more than 12 hours, especially if the weather is too hot. Letting the mate gourd dry out perfectly will help a lot. That´s why many drinkers have more than one gourd. If you have at least 3, this will allow 48hs of drying between uses which is perfect for seasoning them.
How to cure a mate gourd video - Thanks Charles for your video review !